8-Piece Barber Kit for Cutting & Styling Human-Hair Wigs
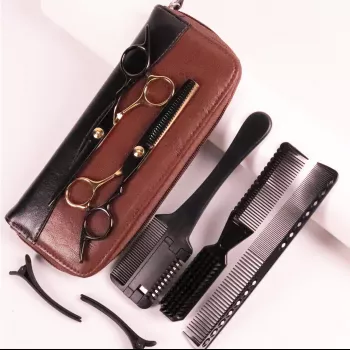
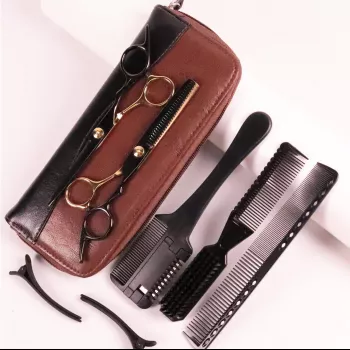
Premium 8-Piece Barber Cutting & Styling Kit for Real Hair Wigs
A real-hair wig can look unbelievably natural when the perimeter is crisp, the interior weight is balanced, and the finishing details are controlled. The challenge is that wig hair behaves differently than hair growing from the scalp: tension changes quickly, the foundation has delicate areas (especially around lace and knots), and a small mistake can show up every time the unit is installed. For more guidance, see Wigs for Cancer Patients: Your Guide to Finding the Right Wig.
A compact barber-style set keeps the full workflow in one place—sectioning, trimming, blending, and detailing—so each pass feels repeatable instead of improvised. If you want reliable results at home or a dedicated toolkit for wig work, start with the fundamentals below and pair them with a purpose-built set like the Premium 8-Piece Barber Cutting & Styling Kit for Real Hair Wigs.
What a Wig Cutting & Styling Kit Should Help You Achieve
- Clean perimeter lines at the front, nape, and ear tabs without jagged edges or “chewed” ends.
- Soft blending for layers and face-framing pieces that don’t look blunt or chopped.
- Controlled volume by removing bulk only where needed instead of thinning everything evenly.
- Consistent results across installs so the same length, shape, and balance returns every time you refresh the unit.
- Safer handling of lace and knots by keeping cutting paths away from delicate foundation areas.
What’s Inside an 8-Piece Barber-Style Set (and What Each Tool Is For)
An effective set covers three phases: (1) sectioning and control, (2) structural cutting, and (3) refining and finishing. When those phases are handled by the right tools, you’re less likely to switch to household scissors or random combs that create uneven tension and drifting cut lines.
Common kit tools and best-use moments for real-hair wigs
| Tool | Best for | Practical tip |
|---|---|---|
| Cutting scissors | Straight trims, shaping the overall outline | Cut with the hair slightly damp for cleaner lines, then re-check dry for spring-back. |
| Thinning/texturizing scissors | Softening ends and reducing bulk | Use mid-length to ends; avoid close to knots and lace to prevent visible gaps. |
| Razor or razor comb (if included) | Light texturizing and movement | Use sparingly on human hair; test on a small section first to avoid frizz. |
| Fine-tooth comb | Tension control, parting, precise sections | Keep comb teeth parallel to the intended cut line for consistency. |
| Wide-tooth comb | Detangling without snapping strands | Start from ends and work upward to protect the cuticle. |
| Sectioning clips | Holding panels out of the way | Clip clean, even panels to maintain symmetry on both sides. |
| Cape or apron (if included) | Keeping fibers off clothing and workspace | Shake out hair frequently to keep the area visible. |
| Storage pouch/case (if included) | Keeping edges sharp and tools organized | Store dry to prevent corrosion and keep blades aligned. |
How to Prep a Human-Hair Wig Before Cutting
- Mount securely: Place the wig on a canvas block head and pin through the foundation for stability. Avoid pinning through lace front areas.
- Detangle gently: Start with a wide-tooth comb from ends to roots, then refine with a fine-tooth comb to set clean sections.
- Choose wet vs. dry: Slight dampness improves control for straight trims, but always do final checks dry to account for shrinkage and bounce.
- Mark reference points: Center part, temple points, and the intended overall length help both sides match with less guesswork.
- Protect lace and knots: Keep blades behind the hairline when possible and avoid pulling tension that distorts the lace edge.
Step-by-Step: Trimming, Layering, and Face-Framing Without Overcutting
1) Set the perimeter first
Start at the back where the baseline length is easiest to control. Take small, even sections and trim to your guide. Then work toward the sides, matching each new section to the established length rather than “free-cutting” from memory.
2) Work in panels for predictable tension
3) Add layers gradually
4) Blend with intention
5) Face-frame conservatively
6) Re-check balance before you “lock it in”
Avoiding Common Wig-Cutting Mistakes
Care and Maintenance for Sharp, Clean Tools
- Wipe blades after each use to remove oils and styling residue that dull edges.
- Disinfect tools that contact hair and scalp areas; follow guidance such as the CDC’s recommendations on cleaning and disinfecting: https://www.cdc.gov/hygiene/cleaning/index.html.
- Oil the pivot point lightly if scissors feel stiff. Smooth movement helps prevent accidental “chunk” cuts.
- Store tools protected so edges don’t knock against other items and go out of alignment.
- Sharpen or replace dull scissors rather than forcing cuts that fray human hair.
Who This Kit Suits Best
Recommended In-Stock Picks
- Premium 8-Piece Barber Cutting & Styling Kit for Real Hair Wigs — a compact, all-in-one set for sectioning, cutting, blending, and finishing human-hair wigs.
- Waterproof Plaid Nylon Backpack for Women Lightweight Laptop School Bag — a practical way to keep a wig head, clips, and tools together for classes, travel, or mobile appointments.
FAQ
Can thinning shears damage a human-hair wig?
They’re safe when used lightly on mid-lengths to ends, but cutting too close to knots or lace can create visible gaps. Use a few controlled passes, then stop and reassess so the ends don’t turn see-through.
Is it better to cut a human-hair wig wet or dry?
Slightly damp hair is often easier to control for clean lines, then a dry check catches spring-back and bounce before you finalize. Wavy or curly textures especially benefit from a final dry refinement.
How do you keep a wig haircut symmetrical?
Mount the wig securely, set a center-part reference, and cut matching section sizes with consistent tension on both sides. Alternating left and right as you go makes it easier to compare progress in real time.










Leave a comment